If you’ve got an .ipa file on your computer and want it running on a stock iPhone, this guide shows how to install IPA with Sideloadly, the desktop tool most people reach for. We’ll cover installing it on Windows or Mac, signing an app with a free Apple ID, trusting it on your iPhone, and the two things that trip people up most: the 7-day clock and the “Untrusted Developer” message.
Sideloadly is one of several ways to get an IPA onto a stock iPhone. If you want the bigger picture first, see our pillar on how to install IPA files on iPhone without a jailbreak.
What Sideloadly is and who it’s for
Sideloadly is a free desktop app that signs an IPA with your own Apple ID and pushes it to your iPhone over USB or Wi-Fi. It runs on Windows 10/11 and on macOS, and it covers a wide range of iOS versions, roughly iOS 7 up through iOS 26 and newer betas, so it tracks current releases rather than lagging behind.
It suits anyone comfortable plugging a phone into a computer and clicking through a one-time setup. Maybe you sideload now and then, want an app the App Store doesn’t carry, or you’re testing a build you wrote yourself. Any of those, and Sideloadly handles it. If you’d rather never touch a computer, a tool like SideStore re-signs apps on-device instead, though it carries its own setup cost.
One thing before you start. Only install IPAs for apps you actually own or have the right to use, and get those files from the developer or another legitimate source. Sideloadly signs and installs whatever you hand it, so the responsibility for the file is yours.
What you need before you start
- An iPhone or iPad. No jailbreak required.
- A Windows 10/11 PC or a Mac.
- A USB cable, preferably the original one. Flaky cables cause flaky installs.
- An Apple ID. A throwaway secondary account is the common advice here, since you’re handing the credentials to a third-party app.
- The .ipa file you want to install.
On Windows there’s one extra requirement people miss. Sideloadly needs the regular desktop version of iTunes and iCloud, the ones you download from Apple’s website, not the versions from the Microsoft Store. If you have the Store versions installed, uninstall them first, then grab the standalone installers. Mac users don’t need iTunes at all.
Step-by-step: installing an IPA with Sideloadly
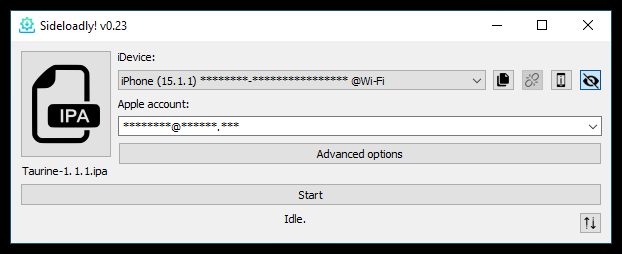
Sideloadly detects your connected iPhone and signs with the Apple ID you enter.
- Download Sideloadly from the official site, sideloadly.io, and run the installer for your operating system. On Windows, confirm the desktop iTunes and iCloud are installed first.
- Connect your iPhone to the computer with the USB cable. The first time, your phone shows a “Trust This Computer?” prompt. Tap Trust and enter your passcode. Your device should now appear in the Sideloadly window.
- Load the IPA. Drag the .ipa file onto the Sideloadly window, or click the IPA icon to browse to it. Once it loads, the app’s name and bundle identifier show up.
- Enter your Apple ID in the Apple Account field. Type the email address you want to sign with.
- Click Start. Sideloadly will ask for your Apple ID password. If you have two-factor authentication on, watch for the verification code on your trusted Apple device and type it in when prompted.
- Wait for signing and install. Sideloadly signs the IPA, uploads it, and installs it. Expect a couple of minutes in most cases, though it can run longer with a large app, a slow network, or an extra 2FA prompt. The app icon appears on your Home Screen when it’s done.
- Trust the developer profile. The app won’t open yet. On your iPhone go to Settings > General > VPN & Device Management, tap your Apple ID email under the Developer App heading, then tap Trust and confirm. Now the app launches.
That’s the whole flow. After the first wired install, Sideloadly can also reach your device over Wi-Fi as long as the phone and computer share a network, which is handy for re-signing later.
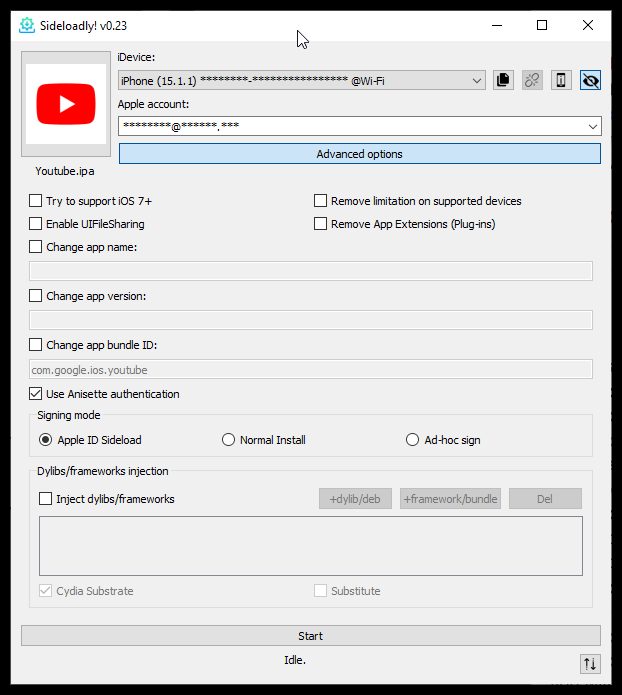
With the IPA loaded and “Apple ID Sideload” picked, hit Start to sign and install.
Tips and troubleshooting
“Untrusted Developer” when you tap the app. This isn’t a failure, it’s the trust step from above. Go to Settings > General > VPN & Device Management, tap your Apple ID, and choose Trust. The app opens after that.
The app stops opening after a week. A free Apple ID only gets a 7-day signing certificate, so once those seven days pass the app refuses to launch until you re-sign it. Sideloadly includes an auto-refresh daemon that re-signs apps in the background before they expire, but it isn’t magic: the computer has to be powered on, running Sideloadly, with your device reachable over Wi-Fi or USB when a refresh comes due. If that setup isn’t practical for you, just plug the phone back in and run the install again with the same IPA.
You can’t install a fourth app. A free Apple ID is capped at three sideloaded apps on one device at a time. Remove one you’ve already installed, or sign with a different Apple ID, to make room. A paid Apple Developer account ($99/year) raises this limit and extends the certificate to a year.
Signing fails after several installs in a row. There’s a separate cap that bites here: a free account can register only 10 unique App IDs per week. Those don’t clear when you delete an app from the device. They expire on their own roughly a week after you registered them, so a heavy sideloading session can leave you waiting for the window to roll over.
Sign-in errors with two-factor enabled. If the password is rejected even though it’s correct, the account’s two-factor setup is usually the cause. Make sure you enter the verification code that pops up on your trusted device. For certain paid-developer setups, an app-specific password generated at account.apple.com is the workaround.
“Device not trusted” mid-install. Disconnect, reconnect the cable, and tap Trust on the phone again. A loose or off-brand cable is the usual culprit, so try a known-good one.
If Sideloadly’s signing approach doesn’t fit your situation, eSign installs IPAs directly on the iPhone using a certificate, no computer in the loop.
Removing a sideloaded app
Getting rid of a sideloaded app takes two steps, not one. First, delete it from the Home Screen the way you’d remove any app. That clears the app itself but can leave its signing profile behind on the device. To tidy that up, open Settings > General > VPN & Device Management, tap the leftover developer profile under your Apple ID, and remove it there. If you ever want the app back, reinstalling it just means running through the signing steps again with the same IPA.
FAQ
Do I have to keep my iPhone plugged into the computer?
Only for the initial install over USB. After that, with both devices on the same Wi-Fi network, Sideloadly can see your iPhone wirelessly and re-sign apps without the cable. The catch is your computer has to be on and running Sideloadly when a re-sign is due.
Why does the app stop opening after a week?
A free Apple ID gets a certificate that lasts seven days, and Apple won’t budge on that. When it expires the app simply won’t launch. Re-sign it in Sideloadly, lean on the auto-refresh daemon if your computer is reliably on, or move to a paid developer account for a one-year certificate.
Is it safe to use my main Apple ID for Sideloadly?
Because you’re entering your credentials into a third-party desktop app, most people keep a separate Apple ID just for sideloading. Recent Sideloadly versions do support accounts with two-factor authentication, and in current builds Advanced Data Protection as well, but a spare account still keeps your primary one out of the equation.
Once you’ve done this a couple of times, the routine takes a few minutes start to finish. Keep your IPA files somewhere you can find them, leave auto-refresh running if your computer stays on, and plan for the occasional manual re-sign when it doesn’t.